How to run Selenium tests in Docker – Comprehensive Step-by-step guide
First of all you need to install Docker. To run selenium tests in docker, and execute the tests from Eclipse, We will have to follow below steps.
- Set Up Docker Selenium Grid: We’ll use Docker to set up a standalone Selenium Grid.
- Create a Maven Project in Eclipse: Set up a basic Maven project in Eclipse to run a sample Selenium test.
- Write a Sample Selenium Test: We’ll create a simple Selenium test in Java.
- Run the Test Using Docker: Use Docker to host the browser and run the test.
Step 1: Set Up Docker Selenium Grid
1. Pull the Selenium Standalone Chrome Image:
If you have Windows based system, then in your terminal, pull the Selenium image with Chrome. You can do this in the inbuilt command window of the docker desktop as well. This command will pull an image to help you run selenium tests in docker.
docker pull selenium/standalone-chromeIf you have mac or linux based system, the above code won’t work. You will have to use below command. This version uses Chromium, which is an open-source browser very similar to Chrome and will work for your Selenium tests.
docker pull selenium/standalone-chromium
2: Run the standalone-chromium Container
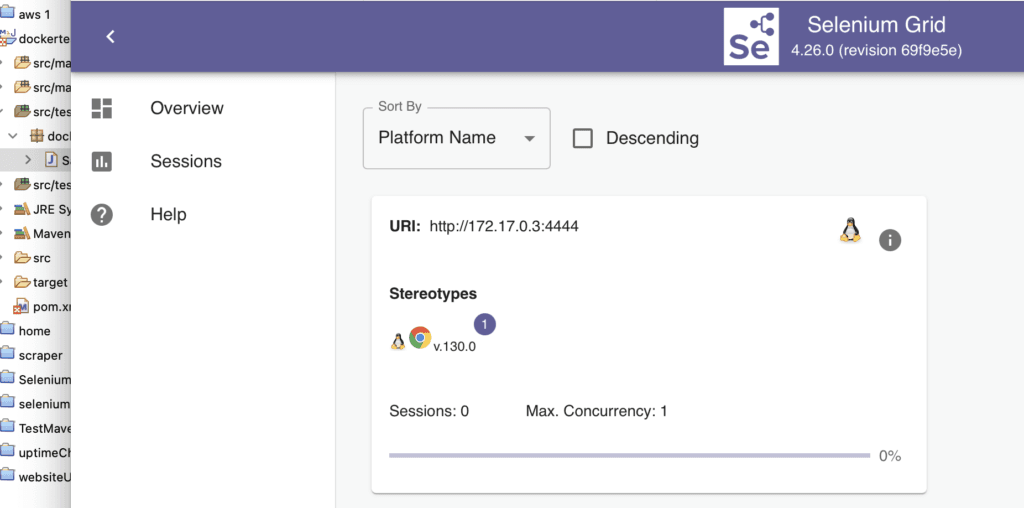
After pulling the image, start the container as follows: You can check and access the grid at http://localhost:4444 in your browser as indicated below.
What it does is, It will run a container which has selenium grid and chrome inside a container. So when you point your selenium tests in docker, through the specified port and remoteWebDriver, It will run the selenium tests in docker through that port.
docker run -d -p 4444:4444 --name selenium-chrome selenium/standalone-chromium

Step 2: Create a Maven Project in Eclipse
- Open Eclipse and go to File > New > Maven Project.
- Choose a Project Template:
- Select the maven-archetype-quickstart template (for a simple Java project).
- Click Next and enter Group Id and Artifact Id (e.g., com.example.selenium).
- Finish the Setup: Eclipse will create a basic Maven project structure for you.
- Update the pom.xml file: Add the following dependencies for Selenium in pom.xml:
	<dependencies>
		<!-- Selenium Dependency -->
		<dependency>
			<groupId>org.seleniumhq.selenium</groupId>
			<artifactId>selenium-java</artifactId>
			<version>4.5.0</version>
		</dependency>
		<!-- JUnit Dependency -->
		<dependency>
			<groupId>org.junit.jupiter</groupId>
			<artifactId>junit-jupiter-engine</artifactId>
			<version>5.9.0</version>
			<scope>test</scope>
		</dependency>
	</dependencies>
	<build>
		<plugins>
			<!-- Maven Surefire Plugin to run JUnit 5 tests -->
			<plugin>
				<groupId>org.apache.maven.plugins</groupId>
				<artifactId>maven-surefire-plugin</artifactId>
				<version>3.0.0-M5</version>
				<configuration>
					<parallel>methods</parallel>
					<!-- Run methods in parallel -->
					<threadCount>2</threadCount>
					<!-- Two threads for two containers -->
				</configuration>
			</plugin>
		</plugins>
	</build>
- Save the pom.xml file and run Maven > Update Project to make sure all dependencies are downloaded.
Step 3: Write a Sample Selenium Test
- In the src/test/java directory, create a new Java class called SampleTest.
- Add the following code to SampleTest.java:
package dockertest;

import org.junit.jupiter.api.AfterAll;
import org.junit.jupiter.api.BeforeAll;
import org.junit.jupiter.api.Test;
import org.openqa.selenium.By;
import org.openqa.selenium.Keys;
import org.openqa.selenium.WebDriver;
import org.openqa.selenium.chrome.ChromeOptions;
import org.openqa.selenium.remote.RemoteWebDriver;

import java.net.MalformedURLException;
import java.net.URL;

import static org.junit.jupiter.api.Assertions.assertEquals;

public class SampleTest {


    private static WebDriver driver;

    @BeforeAll
    public static void setup() throws MalformedURLException {
        ChromeOptions options = new ChromeOptions();
        driver = new RemoteWebDriver(new URL("http://localhost:4444/wd/hub"), options);
    }

    @Test
    public void openGoogle() {

    	try {
    		driver.get("https://www.google.com");
    		System.out.println(driver.getTitle());
    		driver.findElement(By.xpath("//*[@title='Search']")).sendKeys("Selenium");
    		driver.findElement(By.xpath("//*[@title='Search']")).sendKeys(Keys.ENTER);

    		Thread.sleep(2000);
    		System.out.println(driver.getTitle());

    	} catch (InterruptedException e) {

    		e.printStackTrace();
    	}

    	assertEquals("Selenium - Google Search", driver.getTitle());
    }

    @AfterAll
    public static void tearDown() {
        if (driver != null) {
            driver.quit();
        }
    }
}- Explanation of the Code:
- The @BeforeAll method sets up a RemoteWebDriver to connect to the Selenium Chrome instance running on Docker (http://localhost:4444/wd/hub).
- The openGoogle test case opens Google’s homepage and checks if the page title is “Google”.
- The @AfterAll method closes the WebDriver instance after the test.
Step 4: Run the Selenium Tests In Docker
- Start the Selenium Docker Container:
Make sure your Docker container is running. If not, start it:
docker start selenium-chrome- Run the Test from Eclipse:
- Right-click on SampleTest.java in Eclipse and choose Run As > JUnit Test.
- This will execute the test, and Eclipse will display the results.
3. Check the Test Output:
If everything is set up correctly, the test should pass, and you should see a browser automation session in the Docker container.
The next step would be to learn how to leverage docker to run parallel selenium tests in docker.
Discover more from Automation Script
Subscribe to get the latest posts sent to your email.
